In Celebration! Pattern Giveaway and Sneak Peek at Future Knitting "Lessons" from me -- I'd Love Your Input!

A Seafaring Man: In testing, going live at the end of April
I have completed three designs this month while being off work. While it wasn't exactly a goal -- well, not a spoken one -- I have done it. It's small and it's not super significant and Rachel Hollis says I shouldn't apologize for have a small goal, or for having a goal at all and she absolutely would chastise me for not announcing the goal to the public! Since she will never know any of this, I am safe here in my little blogosphere and Ravelry world.

In the past, I did spend too much time worrying
Villains: In testing, to be hopefully live mid-May
about the blog -- who followed, if anyone cared to follow, etc. I, at 50 years old, apparently do not care so much anymore about that. Whether that comes from age, life experience, or Rachel Hollis' books, who knows? 

Here is my decision: I am here to help keep you company and to provide a knitting resource. Patterns, tutorials, anything I can think of. Because here is my greatest strength: I am a cheerleader. I like to encourage others. Would I like lots of others to encourage? Sure! But I am
Heroes: In testing, to be hopefully live mid-May
here if you need me and here when you don't.

I have future plans for this blog and -- not sure on this one yet -- but possibly on YouTube. When you knit as much as I do (and as much as I know all of you do too) people ask you to teach them. In my daily, normal life, I cannot usually commit to teaching people knitting. It takes a lot of individual time and I am not much of a hurrier; I like to take my time. Thus, there is not enough time in the day to add that sort of thing, as much as I'd like to. 

I thought since so many of us are home, and since knitting is a studied, proven stress reliever, and since I would love to teach you all to knit a hat ... well, it just makes sense for me to start a little knitting tutorial here online. 

Anyone have any preferences for tutorials here on the blog? Video-style lessons? Comment below and let me know!


Use the code: housebooties at checkout in my
Ravelry shop to receive this pattern for free!
On to the free pattern giveaway!

In the meantime, let's celebrate (because right now I think we all could use an excuse) with a free pattern giveaway! 

Just subscribe to the blog using the "subscribe" button at the top, then go to my Ravelry shop, add House Booties to your cart and use the code "housebooties" (without the quotation marks!) at checkout to receive a free copy of the pattern! This offer is good starting now until Tuesday at end of day!

Thank you for reading, thank you for your input and thank you for trying out one of my patterns! If you decide to make a pair of House Booties, please tag me @freckledgirlknits on Instagram with pics! 

House Booties!


Heroes and Villains: Some new free patterns are in the works!

My sweet brother the Merchant Marine sent me this
after I sent him some masks as he is home but
quarantined on his ship. He said, "I'll be proud
to wear these, sis."
Hello, all! I sincerely hope you all are doing well, and your families too. We are healthy in our family right now (we think my son had Covid-19 but he is too young to be tested at 26. He was sick a long time, but is now doing well.)

 In addition to doing the homeschool-mom-thing with 11-year-old daughter, I have been working hard on finishing as many designs as possible in the time I have here at home. Working hard also forces focus and helps to control the anxiety that was, at first, always at the front of my mind when the pandemic started, is now usually playing in the background, so to speak, but also which occasionally tries to come out and attempt to wreak havoc on my attempts to feel somewhat normal in this time. Sound familiar to you too? I am sure it does.

Reading social media posts about the anxieties of others, talking to concerned friends and family over Zoom and even the weird new behavior of neighbors crossing the street as they approach you when you take a walk (or perhaps you cross the street first, but I digress...) are all a snapshot, not only of a moment in time, but possibly also of a forever-changed world; one that we don't know the shape and size of yet. The uncertainty is palpable.

And the current atmosphere doesn't just feel like a bizarre exercise in social distancing. It feels very often to many of us like war. Like WWII, to be precise.

Also from my bro, the man for whom "A
Seafaring Man" was designed.
I can't tell you the number of times I see someone making masks on social media--or make some
myself--that calls to mind Rosie the Riveter and her posters from "back then." Now, we have some similar images for the war on this disease, where one of our only defenses is to back away from one another. Stay away from each other and don't breath each others' air, they tell us. As crafting community, we have made so many masks that JoAnn's is now reporting totals nearing 68 million masks, all made to donate by crafters. And that doesn't  even count those of us who do it on our own, helping family, neighbors and friends with some! WOW!

Crafters!! YOU ARE MIGHTY!! 

Yet, even with this positive force in the crafting world, I found myself inexplicably wanting to do something else. Something to help those in need -- especially financially at this time. I keep thinking about those who are poorest, the kids with no school lunches right now to be their one meal of the day, and I keep wondering about those who had Covid-19 and were hospitalized ... but lived. Now what for them? Possibly a huge medical bill with no job? A way to pay?

So I got thinking.


Here is the link to my Ravelry project page for a little more info!

There are charities right now helping these very folks. Lots of them. The food banks being in great need, first of all. Feed America is the biggest one in the US, for example. Then there is another charity I was fascinated by: Give Directly's Covid-19 response. They actually give cash to those who need it most. And they've been doing it for a long time. The third organization I thought of was the hospitals themselves. Did you know that individual hospitals have funds to help those in need pay their medical bills? They do!

All of these worthy organizations had my attention. I thought, what if I created a knitting pattern? One that could depict the situation right now? I could sell it and the proceeds to go to one of these organizations. Or I could break up the proceeds and give to all three.

Then I thought, no. I wanted anyone who wants to knit a pattern like that should be able to have it.
Here is a link to my Ravelry project page for more info
For free. If anyone who makes one of these patterns would like to help in any way, please donate to a charitable organization of your choice.

As I mulled over what image might shows today's troubles, the one pattern turned into two. I chose to focus on the Villains and the Heroes. The virus itself is the Villain, obviously, and the Heroes I chose to focus on are the medical professionals who battle this thing day and night (incidentally, a close classmate of mine from college -- she is an RN and I am an RDH -- just recovered from this Covid-19. She is one of many, I realize.). I acknowledge there are many other heroes: the kids working at fast food places; the people in the grocery stores.The Postal workers, police and firemen. All amazing humans. I honor them as well!

They were all on my mind as I worked on these two patterns. Who knows? Maybe I have a few more patterns in mind. If people are interested, then I'll create more!

Villains and Heroes are in pattern testing right now, and I am hoping to release them in my Ravelry shop by mid-May. Until then, be safe, do good work, make masks and do whatever else makes you feel helpful and useful.


How to Make a Simple Yarn Tassel (A Pretty Good One: My Two Cents)


Picture Tutorial for 6(9) in/15(23) cm Tassels

Materials include:
  •   26g/39g worsted weight yarn such as Rowan Pure Wool Worsted 
  •   A 3x6(8x15)in/8x15(20x38)cm sturdy piece of cardboard
  • Two lengths of yarn for tying and wrapping the top areas of the tassel
  • Scissors


1. Starting at the bottom of the cardboard, wrap the yarn around the cardboard the long way about 50 times. This will give you 100 tassel “strands.” If you’d like a fluffier tassel, feel free to wrap even more times.

Don’t wrap too tightly or you might bend your cardboard as I’ve done in the picture below! Tight wrapping might also shorten the length of your tassel or make it harder to remove from the cardboard.


2. Thread a length of yarn about 6in/5cm or a bit longer through a darning needle (or use your fingers) and run the piece of yarn under all the wraps at the top. Tie them together tightly at the top with a double knot. Carefully slide the yarn off the cardboard and lay it carefully onto a table. Smooth a bit if needed.


3. Cut another length of yarn about 10in/25cm long. About 1inc/2.5cm down from the top knot, wrap the yarn several times around all the strands, creating a “neck” at the top of the tassel. Tie off or tuck end into the wraps on the neck.


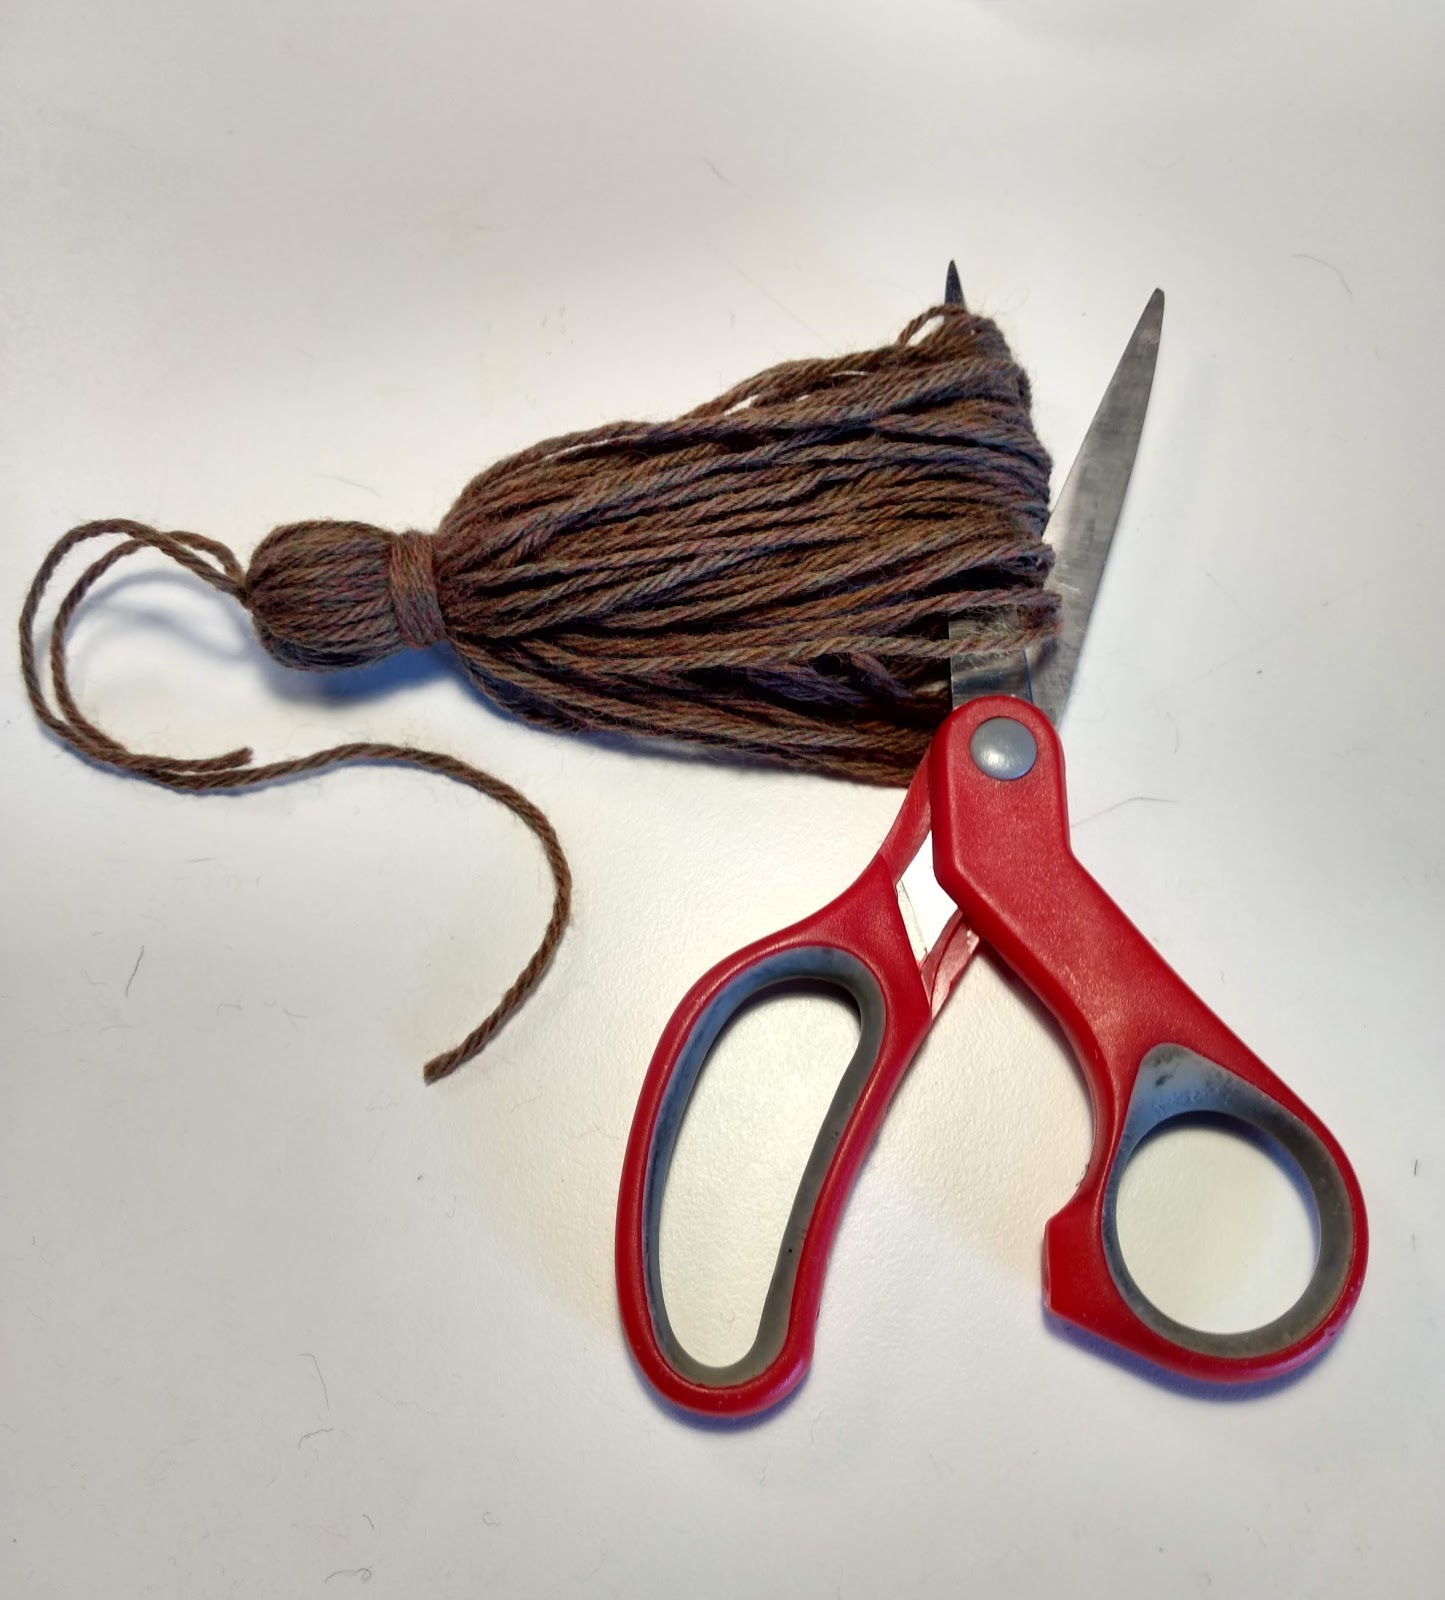
Carefully sliding a scissors through all the bottom loops, cut through all the loops to create tassel strands.


To smooth out the yarn strands, wet thoroughly as if to block and hang to dry. Once your tassel is dry, trim the ends to make them even. If you want to be fiddly, you can comb the strands out after they dry and before the final trim to really make them even. Tie them onto the corners of you hat!


Three Needle Bind-Off Tutorial to Seam the Top of a Hat

This is where we begin. Your hat is the desired length.
***NOTE: While the method presented in this tutorial can be used for other knitted hats, my newest pattern, A Seafaring Man, pictured in this post, is currently in testing. If you would like notification once the pattern is released, please PM me on Ravelry for an earburn! Thank you for reading my blog post, and tag me on Instagram @freckledgirl knits if you give 3-needle bind-off a try!***

If you are knitting my newest pattern, A Seafaring Man, and you have never executed a 3-needle bind-off before, I am here to help!

Yes, the crown of the hat can be finished traditionally, with a round top, created using decreases at regular intervals, and that is included in the pattern as well. However, if you are interested in creating a knife-edge, square top, with a seam straight across the top of the hat, then this is the tutorial for you. In addition to the work currently on your circular needles, you will need an extra needle in the same size as your circulars, such as a dpn or straight needle.

(Note: This method will work to finish the top of any hat that has been knitted in the round! Just be sure that your hat is the final height you want it to be before starting the bind-off.)

Once you achieve the desired length of the hat, you are going to very carefully flip the hat inside out and bind off all the stitches together to create an interior seam. Let's go!

Add caption
1. Once you achieve the total desired length of your hat, remove the stitch marker and set aside. 

NOTE: If you are working A Seafaring Man, please note that all the sizes have an even number of stitches, so as you work this bind-off, each of your stitches will have a "partner" and will match up evenly. 

2. This is a tricky part: without letting your stitches slide off your circular needles, very carefully turn you hat inside out. After that, you might want to slide your ball of yarn through the top so it is on the new "outside." This just makes it a little less fiddly (I have done that here in the photo). Line up your circular needles side by side. You will have a bit of bunchy stitches on the cord of the circular needles. This is okay, but if it really bothers you and feels too fiddly or messy, you could choose to slide all the stitches onto a much longer circular, if you want. That would make it easier to have the stitches side by side. Just be sure to keep the start of the round in the same spot, especially if you are using this to close the top of a hat with a defined front and back. Knitter's choice!

If you have done a 3-needle bind-off in the past to seam sweater shoulders, for example, you will notice a difference here. The working yarn is attached to the front needle instead of the back. That's ok. This will still work. 


3. Hold the two ends of your circular needle close together with your left hand. Using your extra needle (I used a dpn in US7, just like my circulars), enter the first stitch on the front circular needle (the needle closest to you) from front to back, just as you would to knit a normal knit stitch. Now continue on to do the same for the matching stitch on the circular needle in the back (the circular needle farthest from you). Your extra needle is now going through two stitches, the front one and the back one. 


4. Knit those two stitches together as one. You now have one stitch on the right (extra) needle and all the rest still on the circulars.


5. Repeat steps 3 and 4. You now have two stitches on the extra needle. 

Pictured above, I have done a few bind-off stitches to show the seam starting. 


6.
 Working on the extra needle: slide the first stitch you knitted over the second one and off the needle. You now have one stitch left on the right needle, just as you would in a regular bind-off. 


7. Continue to repeat steps 3-6, working through the stitches on the circular needles. 


8. When you are about halfway through binding off the stitches, you might notice some tension starting on the stitches still waiting to be worked. Fold the cord in half, separating the stitches in half and slide them up to the needles to continue, letting the cord stick out the back, as pictured. Try to be sure that the stitches are divided exactly in half, but if you get to the end and they are not, you can always re-adjust them without too much trouble. (I had to do that on the hat pictured!)


9. Once you have completed binding off all the stitches, cut the yarn, thread it through the remaining stitch/loop and weave in the end! 

Now you can easily flip your hat right side out. Note the nice, clean seam on the top! Once you block it, it will be even smoother. 


A freshly seamed hat, pictured above!


Flipping the finished hat right-side out is much easier than the other way around!

Note: To block these hats (for I have made a few!), I have been soaking them in lukewarm water with some Eucalan, pressing the excess water out in a clean dry towel, and laying them out on another dry, clean towel till dry. Alternately, you could put them on a hat form, too, instead of a towel once the excess water is squeezed out!

Please tag me on Instagram with your projects using the 3-needle bind-off! 


How-to Make a Pom Pom Picture Tutorial (Don't get too excited. No Alchemy Here)


How to Make a Pom Pom without losing too much of your mind, the old fashioned way (with some better tutorials than mine at the end -- and it's okay if you decide now to scroll down there!)

Ah, the traditional pom pom. Not my fav project. It feels like too much trouble for the outcome. And how many of us have gone seeking real help on YouTube and instead we find an all-too-cheery mom with a kid on each hip telling us in her chipper, shrill tone, "I'm addicted to pom pom making! I love them and I just can't stop!" (((laughs maniacally)) Sure, sweetheart. Sure. As a mother of 6 myself, I am here to tell you that you may just need a little more grown-up conversation. Or something...

This video then rushes into hyperspeed, and becomes a blur of wrapping, cutting, yarn, all sped up like time lapse nature photography so we don't switch channels before the pom pom is done. And -- oh, wait, what did I miss? -- a perfect pom pom just appears on the screen and the super chipper mom is back telling us to subscribe. I still don't have a pom pom.

Ok. I'm joking around. Mostly. And there are really are some good video resources out there to help, and other pictorials like this one I am making here. I guess that, for me, there are a couple of truths in pom pom making that are just unavoidable: pom poms are fiddly, more time-consuming than I want them to be and -- brace yourself -- they don't always turn out, and in the worst cases, sometimes you have to start over. That just has to be ok.

With that, let's try to make a not-too-irritating pom pom. First, as I say: we must use patience. Make sure you don't have a lot of distractions, and that no one is going to imminently need your hands for about 15 minutes -- or 20.

We are going to make a pom pom (or two) that is about 3" in diameter. 


You will need:

  • Firm cardboard, such as from an Amazon box. You know you have one. Or three. I do.
  • Sharp scissors. I've seen some people use tiny surgical scissors or even razor blades (I've actually seen that done!). Sharp is the best -- and the safest -- option. You don't want to slip with a dull blade.
  • About 13-20g of yarn. I used 15g  of Lion Brand Wool Ease for the gold pom pom It's the firmest and fluffiest. The green one was made using 12g Red Heart worsted acrylic yarn and the blue guys were made using a total of 13g of Patons Classic Wool.
  • A jar or glass that measures about 3 inches in diameter, more is ok. 4" might even be better. 
  • Another round object about 1.5 inches in diameter, like the top of a small lotion bottle or even a quarter would work. 
  • A reliable pen. (Why create more annoyance with a pen that won't write?)

First, draw two matching circles on your cardboard with the little circles inside them. Just do your best to get them in the center. I know. They look like boobs.


Cut them out, creating a Pacman-like "C" shape.


Holding your C-shaped forms together, begin to wrap your yarn, patiently and slowly back and forth around the "C's." The trick is to wrap evenly, and use a LOT of yarn. And wrap sort of loosely. If you wrap too tightly, you won't be able to slide the blade of your scissors between the cardboard pieces. This will become important in a moment.


My gold pom pom got pretty fat, as you see below, and it turned out to be the best one of the bunch. Thickness is key in order for the pom pom to "stand" up on it's little c-shaped frame. This will help you tie it. Note: be sure not to creep too close to the ends of the "C" when wrapping. That made it harder for me, I think, to hold the looser yarn bits in place after I cut the outside edge. 


Here begins the fiddly part. You will next take your sharp scissors, slide/wiggle the open blade in between the two C-shaped pieces of cardboard and begin cutting the yarn. In the first pic below, I am not showing my left hand holding the yarn while I cut (in order to get the photo), but you'll want to hold the yarn onto your C-shaped forms with your fingers, as you can see me doing two photos down.


Go slowly and use VERY sharp scissors for best results. It is almost impossible to cut the yarn when it's this thick and your scissors are dull. 

Hold the inside yarn when cutting!

When my outside edge was all cut, I tried to patiently smooth the yarn into place, evening up -- just a little -- any strands that looked a bit uneven. It worked well, as long as I went slowly and gently. Trust that it will stay mostly in the little form.

Smoothing the yarn out.

Here is another pic of the "loose" yarn. It doesn't jump out, or
anything, so you can work with it a little. 

I think this may be the hardest part: slide a length of yarn between the pieces of cardboard. I used a piece about 10 inches long.


Below, you can see how it looks once the yarn is nestled all the way between the C-shapes. Preparing to tie!


Carefully tie a very firm knot in the center of the pom pom, holding all the pieces together. (Really -- it can work!)


Now you can slide the cardboard out. The C-shaped pieces are reusable, if you liked the ones you made. 


You'll have to trim your pom pom to be more even. Don't do what I've done in the past: trim wayyyyy too short and have your yarn start to all fall out of your tie!! 


Now you can use your pom poms for something! 


Final tip: watch out when you wash items with pom poms on them. I'd recommend hand-washing hats, etc, that have handmade poms, just to be sure they don't start to lose strands. 


Here are some truly helpful links for more pom pom making:

1. A Rectangle option! 


3. *** This one is my fav **** Sheep& Stitch:  https://www.youtube.com/watch?v=zok9hqyhTQ4

4. Clover Pom Pom Maker (why have I not done this? Seems to solve soooo many problems!!)


Looking forward to your comments, any suggestions you all have!! Please leave them! And if you'd like, you can tag me on Instagram @freckledgirlknits to show me your pom successes (and failures, too! We all have them!) ! :) :) :) 


Heroes are Here! New Pattern, Partie Deux! (Plus a little history on the caduceus)

Heroes! I created this pattern in honor of all the heroes in the medical field who go to work every day to help us all. Knit a hat, give...